Step 6. Setup Amazon Simple Email Service (SES)
IMPORTANT: Before continuing, ensure that the drop down menu at the top right of your
SES console displays the same region as what is set in your Sendy main Settings under 'Amazon SES region'.
In order to start sending bulk emails, you need to verify your sending emails or domains and increase your SES Sending Limits.
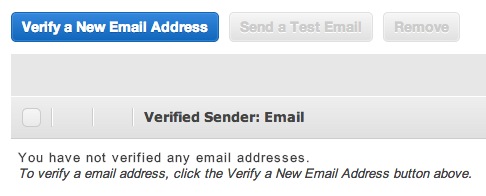
- Verify your sending email address in your Amazon SES console > Verified Senders > Email Addresses. Say you're going to useyourname@domain.com to send newsletters in Sendy , verify yourname@domain.com in your SES console. Click the Verify a New Email Address button and follow the instructions.
Tip: If you want to send from any email address belonging to a particular domain without having to verify each email address, verify your sending domain instead (see #2 below).
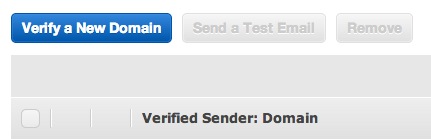
- To verify your sending domain, go to your Amazon SES console > Verified Senders > Domains. Then click the Verify a New Domain button and follow the instructions. By verifying your sending domain, you can send from any email address belonging to this domain without verifying them in #1.
Note: Do not verify your domain with 'www' prepended to your domain. Eg. if your domain is mydomain.com, verify mydomain.com andnot www.mydomain.com unless your emails looks like this name@www.mydomain.com (which is rarely the case).
- Now, you'll need to request Amazon to increase your SES Sending Limits to get your Amazon SES account out of "sandbox mode". You'll then be able to send to and from any email address as well as raise your daily sending limits from 200 per day to a number you need.
Step 7. Setup bounce handling
IMPORTANT: Before continuing, ensure that the drop down menu at the top right of your
SNS console displays the same region as what is set in your Sendy main Settings under 'Amazon SES region'.
Amazon SNS is required to track bounces & complaints. If an email bounced, the email address will be flagged in Sendy so that future newsletters won't be sent to them again. To make this possible, here's what you need to do:
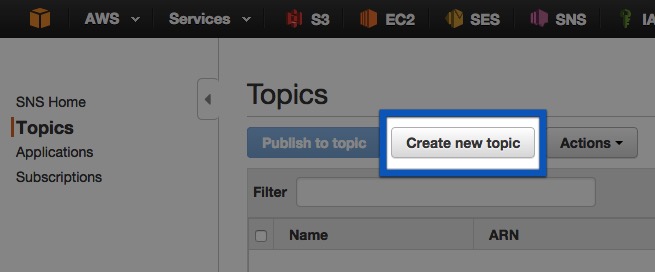
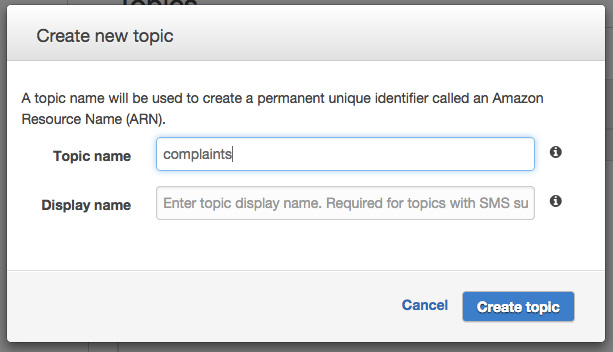
- Go to your SNS console, click Topics on the left sidebar, then click the Create new topic button.
Name it bounces and leave the Display name blank, then click the Create topic button.
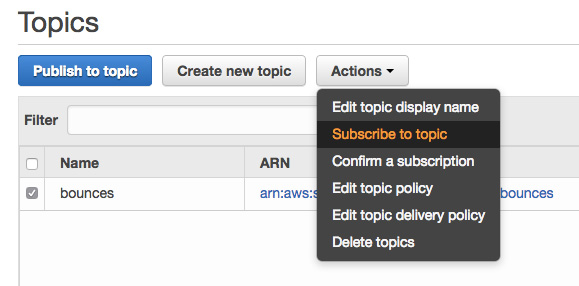
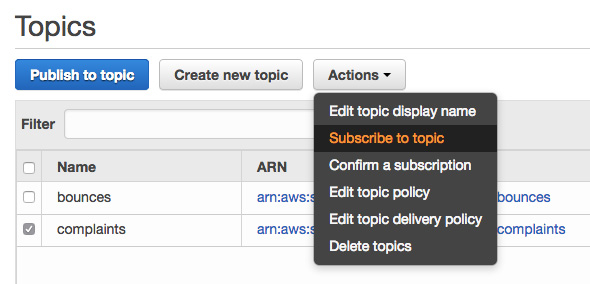
- After creating the topic bounces, click the 'bounces' checkbox then click the Actions button, then click Subscribe to topic.
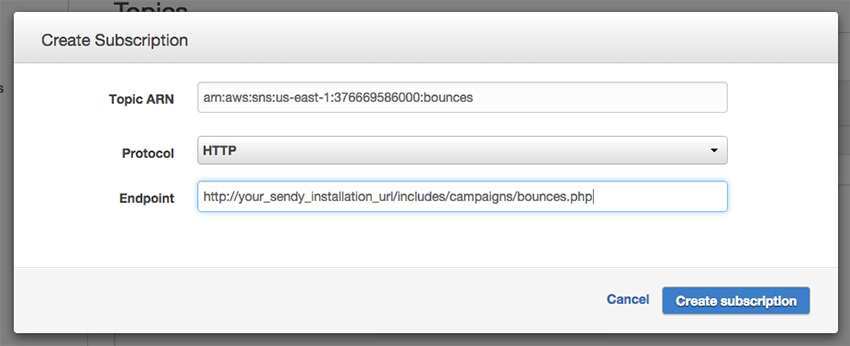
- Now you need to populate the Endpoint field. Let's say you installed Sendy on http://yourdomain/ sendy /, your Endpoint will behttp://yourdomain/ sendy /includes/campaigns/bounces.php. In other words, includes/campaigns/bounces.php should be appended at the end of your installation URL.
Click the Create subscription button. Sendy will instantly confirm the subscription.
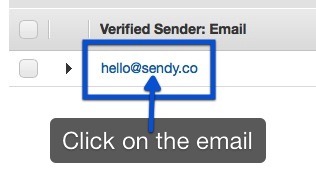
- Go to your Amazon SES console > Verified Senders > Email Addresses and click on the email you attempted to verify. If you verified a domain, go to Amazon SES console > Verified Senders > Domains and click on the domain you attempted to verify.
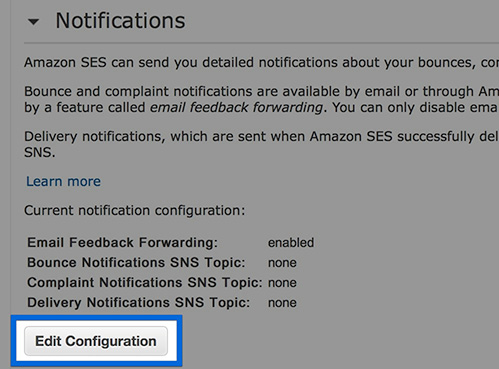
- Under 'Notifications', click Edit Configuration.
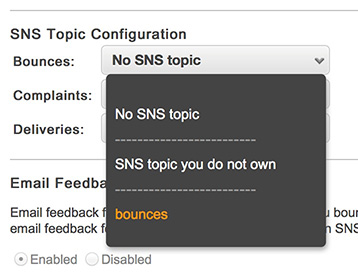
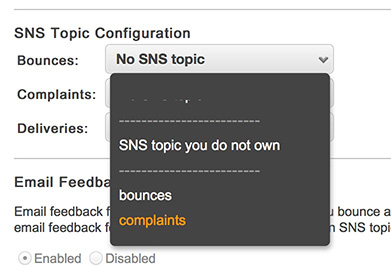
- Under 'SNS Topic Configuration', click the Bounces drop down menu and select bounces (which is what you've created previously in your SNS console).
- Repeat #5 to #7 for every email and/or domain you've previously verified in your SES console.
- Done! All email bounces will now be tracked and handled when you send emails in Sendy .
Step 8. Setup complaints handling
IMPORTANT: Before continuing, ensure that the drop down menu at the top right of your
SNS console displays the same region as what is set in your Sendy main Settings under 'Amazon SES region'.
If a user marks your email as spam, they will be flagged in Sendy so that future newsletters won't be sent to them again.
The following steps to setup complaints handling are identical to bounce handling in the previous step:
- Click Create new topic in your SNS console.
Name it complaints and leave the Display name blank, then click the Create topic button..
- After creating the topic complaints, click the 'complaints' checkbox then click the Actions button, then click Subscribe to topic.
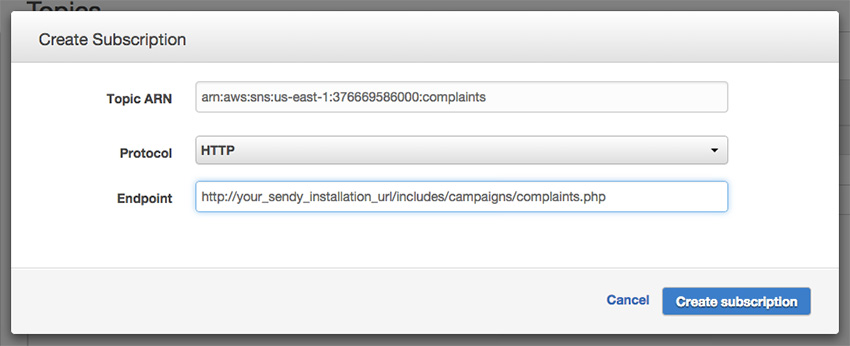
- Now you need to populate the Endpoint field. Let's say you installed Sendy on http://yourdomain/ sendy /, your Endpoint will behttp://yourdomain/ sendy /includes/campaigns/complaints.php. In other words, includes/campaigns/complaints.phpshould be appended at the end of your installation URL.
Click the Create subscription button. Sendy will instantly confirm the subscription.
- Go to your Amazon SES console > Verified Senders > Email Addresses and click on the email you attempted to verify. If you verified a domain, go to Amazon SES console > Verified Senders > Domains and click on the domain you attempted to verify.
- Under 'Notifications', click Edit Configuration.
- Under 'SNS Topic Configuration', click the Complaints drop down menu, scroll down and select complaints (which is what you've created previously in your SNS console).
- Repeat #5 to #7 for every email and/or domain you've previously verified in your SES console.
- By now, you should have setup bounces and complaints for every verified email and/or domain.
Enjoy Sendy ! What's next?
Congratulations! You're all set up.
Log in to your Sendy installation and start adding your first Brand. What are brands? Let's just say you own this company called Apple Inc and you have several products under it eg. Mac, iPhone, iPad etc. These several "child" products are what we refer to as 'brands'. With brands, you can also setup accounts for each of your clients. Optionally send them a password to login and send newsletters on their own at a price you set.
Going forward, for any ‘From email’ you want to use in Sendy , you need to verify either the email address OR its domain via your Amazon SES console (see Step 6). After which make sure to complete Step 7.5 to 7.7 and Step 8.5 to 8.7 (watch this 15 secs video) after verifying your ‘From email’ or its domain to ensure ‘bounces’ and ‘complaints’ handling are working when you send out a campaign.
Have fun!
")